Today’s home theater scene is changing like never before. With the advent of flat panel displays, an interesting design trend is developing in the custom installation industry. It seems that most clients are interested in surround sound to accompany their flat-panel video installations. Yet, at the same time, they and their decorators are rejecting traditional home theater designs and will gladly sacrifice sound quality or surround sound altogether for higher aesthetics. This new breed of client believes that surround sound is better heard than seen.
As a custom installer, you can view this phenomenon in two ways. It’s either an impediment to selling surround sound or an opportunity for higher profits by offering vanishing home theater solutions that exceed your clients’ expectations. No one said that today’s clients wouldn’t pay for surround sound. They just don’t want to see speakers everywhere, which in their view distract from the clean aesthetics associated with flat panel displays. So here are a few tips for making home theaters disappear.
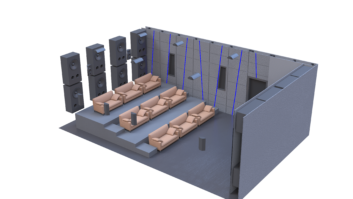
Location, location, location. The same rule that applies to real estate, also applies to surround sound speakers. In this case the best locations are not ones with scenic views. Rather, the best locations for hidden home theater speakers are inconspicuous areas where in-wall, on-wall or ceiling-mount speakers can be installed. Pick out several locations in the design space that do not compete with the aesthetic center of the room. Make sure that each location has an unobstructed path to the home theater seating area to ensure clean sound all around.
In some cases, in-wall or on-wall speakers will fill the bill. The front speakers should be arrayed across the same wall as the flat screen display with the center channel installed above or below the viewing screen. How far apart you space the left and right channels depends on your clients’ viewing patterns. You will probably want to talk to your clients to determine their primary viewing intentions. If they are planning intimate viewing, install the left and right channels equidistant from the primary seating position and approximately 45 degrees off-axis from it. On the other hand, if your clients are planning group viewing, of sporting events for instance, then increase the off-axis angle to 65 or 70 degrees. This will give broader coverage and create a larger soundstage that more viewers can enjoy.
Additionally, don’t forget about the mounting height. Ideally, the center channel should be installed as close to ear level as possible for clear dialogue reproduction. Because flat panel displays are typically mounted a bit higher on walls, you might find that mounting the center-channel speaker horizontally below the viewing screen sounds best. The left and right channel speakers can then be mounted vertically with their centers aligned to the horizontal center of the viewing screen. This gives an acceptable aesthetic and preserves sound integrity as it transitions from the center to the side speakers. If the flat-panel display is positioned lower, on a piece of furniture for instance, then mount the center-channel speaker above the viewing screen instead.
With the left, center and right channels taken care of its time to consider surround speaker’s locations. If possible, surround speakers should be installed high up on the sidewalls, at least two to three feet above ear level, and slightly behind the main seating area. If they have pivoting tweeters, do not aim the tweeters directly into the seating area. Surround speakers are intended to create a diffuse or non-specific soundstage so that sonic images are more enveloping. Aiming the tweeters will localize the surround effects and diminish the surround experience. Rear wall placement is not recommended, because they tend to call too much attention to themselves.
All of this sounds good. But in the real world, you are going to encounter many system designs where in-wall or on-wall speakers are just not acceptable. This is either due to aesthetics or available wall space. More often than not one of two things is going to happen. Either the interior decorator will not agree with the aesthetics of in-wall or on-wall speakers or the ideal speaker locations are occupied with art, furniture, windows, doorways or draperies. In these cases you will find a ceiling-mount speaker solution is best.
Up until recently, a complete ceiling-mount home theater was not practical. In the past, traditional in-ceiling speakers were not capable of directing the critical midrange tones toward the main seating area. However, several innovative ceiling mount speaker designs have made their way to market recently. These new types of speakers give you the ability to direct the soundfield from each speaker in any direction that you want. So you can create ceiling-mount theater systems that are aesthetically unobtrusive and deliver high-performance home theater sound.
When installing a ceiling mount system, follow the same basic rules as you would in setting up a traditional home theater. Locate the center channel directly above the viewing screen and direct the soundfield at the primary seating area. Space the left and right channels equidistant from the primary seating area anywhere from 45 to 70 degrees off-axis. Use a snap-line and make sure that the left-, center- and right-channel speakers are on the same vertical plane. Place the surround speakers to the sides and slightly behind the seating area and experiment with directing the sound so that the soundfield envelops you, rather than coming directly at you. In larger areas, you can use two pairs of surround speakers placed in a horseshoe pattern at the sides and slightly behind the seating area for broader coverage. In this case be sure that the nominal impedance of each speaker is 8 ohms.
Regardless of whether you are installing an in-wall or ceiling-mount hidden theater solution, you will also want to consider what is behind the walls or ceiling. What is behind the speaker not only affects its performance; it controls unwanted sound from straying into other areas of the house. Again, custom installation vendors have several solutions for you. In new contraction jobs you can specify metal enclosures. They are typically designed to give installed speakers an ideal enclosure volume to optimize performance and also have insulation to control sound leakage. In retrofit scenarios you can purchase foam enclosures or use some good old R-19 placed into the wall or ceiling space leaving a cavity behind the speakers.
With the left, center, and right channels taken care, the last element of your design is the subwoofer. In some small spaces, like dens or bedrooms, a subwoofer isn’t necessary. If you don’t plan to use a subwoofer, be sure to select that appropriate setting in the menu of your surround sound receiver. You can choose either a freestanding or built-in subwoofer model. Built-in subwoofers are there for life. Therefore, you may want to seek the advice of an acoustic consultant in these cases. Predicting and dealing with standing waves associated with these application is a complex science that takes into consideration resonance of the space as well as the sound absorption, reflection, and diffusion characteristics of the space and its contents. Freestanding subs, on the other hand, give you a higher degree of placement flexibility. Being able to move the woofer around a bit gives you additional fine-tuning capabilities.
So, what’s the message? In keeping up with today’s home theater trends, you will definitely be hiding more home theater speakers. To get great sound, however, there are several technical elements that you will want to keep in mind when doing so. Once the installation is trimmed out the set up procedures are the same as conventional home theaters. Set the delays, channel balance and processing enhancements as you would normally. Then give the system a final listen to adjust any on-speaker tone controls or subwoofer phase controls, put on a good demo and impress your clients.
Mike “Sparky” Detmer ([email protected]) is vice president of sales and marketing of Niles Audio Corp.