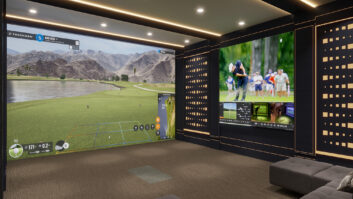
The front projection category has continuously proven to be a profitable product segment for custom installation consumer electronics integrators, most recently growing approximately 20 percent in 2008. As more and more customers recognize the cinematic video quality front projection solutions offer over their flat panel counterparts, two piece projection systems have shifted from dedicated home theaters to become an affordable, versatile, high performance display anywhere the home entertainment experience is placed at a premium.
Many AV mount manufacturers now offer several innovative product options to help integrators properly install projection system quickly, while achieving optimal performance.
Just as the influx of HDTVs provided in recent years, the emergence of front projection offers AV mount companies increasing market opportunities. Many now offer myriad innovative product options to help integrators properly install projection systems to quickly achieve optimal performance and save aggravation.
Positioning
Determining where to install a ceiling mounted projector is an exacting process that will directly impact the performance of the projection system. Before you begin the mounting process, consider the performance capabilities of the projector including throw distance, light output, and lens shift options. Room design and lighting conditions can impact this, however. In general the projector evaluated in correlation with the screen size, gain of the screen material, and height from the top of the screen will help you to correctly determine the system’s placement within the viewing environment.
Utilize partners╒ screen configuration tools and examining the product specifications of the projection system, to assist you in pinpointing the correct distance from the screen and height positioning from the ceiling. Once determined, in-field professionals can further investigate room structure and wiring before beginning the installation process of the projector, mount and screen.
Power Supply
Structured wiring within the home is a key element of installing an audio/video system. Evaluate the room to determine whether the room offers pre-installed wiring or if the project will require running new cables through the room to power the projection system, loudspeakers, and other audio and video components.
Ideally, today’s technology-ready homes will offer existing wiring. However, a new power plan may be required in older homes or remodeling projects to drill holes and feed the wiring through the ceiling and throughout the room without greatly altering the aesthetics of the room.
Demarcation points on the ceiling and in the walls can remain discrete to the eye, as well as offer greater protection for the wiring and equipment. Once the cabling needs are determined for all system components, select a projector mount that offers complimenting cable management and adjustment features to enable a flexible installation plan.
Safety First
All projectors vary in size and shape. Be sure to select a mount with a universal design to provide greater levels of compatibility. Durability and stability are equally as important to accommodate the desired projector, support its weight, and eliminate future mishaps by protecting the equipment, the viewers, and the surrounding entertainment environment.
To achieve this, the mount and projector load needs to be installed with proper support from the room structure. This surface should be able to support up to four times the weight of the combined weight of the mount and projector. The mounting system should be securely bolted into a ceiling beam or joist, or, if neither are present near the ideal mounting position, the system needs to be anchored to mounting plate that is provided with the mount and affixed to the ceiling.
Hang the Projector and Screen
Once the positioning is determined and the projector mount is fastened to the appropriate structure, the power cables and wires can be fed through the mount and you are ready to hang the projector. To make the installation process even simpler, look to mount manufacturers that offer out-of-the-box readiness and provide all of the hardware necessary for the job.
A quality projector mount makes this step seamless by requiring little time to connect the two by providing cable management solutions, is compatible with different hole mounting patterns, and offering easily adjustable tilt and pitch options while in the mounted position.
The projection screen can then be installed in the projection line of the system. The two piece projection system can then be shifted and tweaked accordingly to ensure that the image is properly displayed and maximizing the screen surface to achieve the cinematic experience.
Calibrate, Adjust and Focus
After the projector and screen are correctly positioned and the mount and projector are adjusted accordingly, the final step is to ensure the greatest image quality. Dial the system in. This service can and should be repeated occasionally to ensure the equipment is functioning properly and that the customer is getting the best theater experience.
As custom installation professionals, it is our job to ensure that the projection system is optimized for the room in which it is installed. Calibrate the projector and test it with standard and high-definition video content to maximize the system’s capabilities and achieve the rich colors, deep black levels, and sharpest video reproduction possible.