Kudos: High brightness; tons of menu/settings options; impressive HDR performance; massive placement flexibility
Concerns: All the memories can be confusing; full laser off only works in Dynamic; some upscaling twitter; no tweaks to DTM settings
We have a running joke/saying at our company whenever a company introduces a new product or policy that just seems like it came out of nowhere, and that is designed to totally benefit them instead of us. “It’s what you, the custom installer, wanted…”
Fact is, not a lot of companies give us exactly what we want as custom installers.
But for its latest projection family launch, Epson did go out and talk with and poll dealers, and visited different markets to find out what we the custom installers actually want in its new 4K HDR laser projector lineup. Turns out, we wanted five things from Epson: [1] More CI-channel-dedicated products; [2] Higher price points; [3] Best-in-class dealer margins; [4] Better availability; and [5] Better dealer resources.

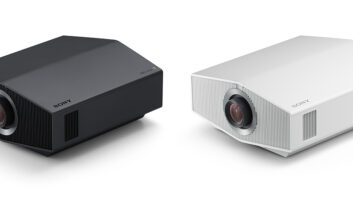
The result was Epson’s new Premium Residential models QB1000, QL3000, and QL7000 launched at CEDIA Expo 2024. All these models are designed to take Epson’s high-brightness commercial projection expertise to the upscale residential market. The QB1000 (reviewed here) clocks in at 3300 lumens, the QL3000 at 6000, and the QL7000 at an eye-melting 10,000.
Considering that projectors priced comparably and even up to twice the QB1000 generally have roughly 1000 lumens less brightness, that is quite a benchmark. And the QL7000 is not only significantly lower-priced than other 10,000-lumen projectors, but it is also significantly smaller, lighter, and quieter than other models, meaning it likely wouldn’t need to be housed in a special projection room or hush box.
Epson’s senior product manager of home entertainment, Melvin Diaz, said that the Q-Series’ high brightness is designed to deliver in three key areas: [1] Deliver a larger-scale viewing experience than traditional flat panel TVs; [2] Enable installations in brighter, mixed-use environments, and [3] Drive an impactful HDR experience, all within a sleek, design-conscious form factor.
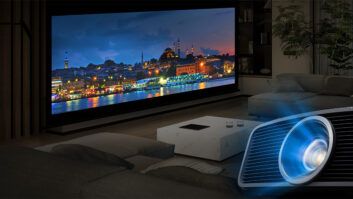
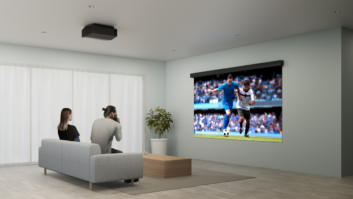
There’s no question that large direct-view displays have been eating projectors’ lunch in many projects, and Epson agrees that the days of 92-inch projection screens are largely over. Having more light output allows driving larger, more cinematic screen sizes, and unlocks the ability to use projection in more spaces.
It also allows Epson to hit the recommended on-screen brightness for the new DCI CTP 1.4 HDR standard (established in 2023), which is 300 nits (±30). When paired with a 1.3 gain screen, the QB1000 delivers 272 nits at 129-inch diagonal, while the QL3000 achieves this on a 174-inch screen, and the light-cannon QL7000 on a 224-inch screen. Of course, all these models feature the benefits of laser projection, which include a longer lifespan (20,000 hours to 50% brightness), consistent brightness and color across its lifespan, and less turn-on “stress” on the light engine.
Having seen these three models in action when they were unveiled at CEDIA, I was interested to give the QB1000 a run in my own theater and see how it held up in actual real-world use.
First Impressions
To be more multi-use friendly, all three of the models are available in either matte black or white case finishes, and Epson sent along the white model for review. Since my projector is in my great room, the white Epson was definitely more décor-friendly than the black projector I currently have hanging.
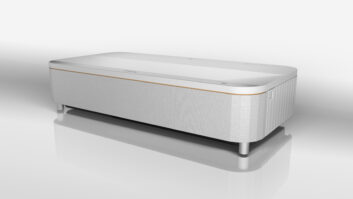
While the QB1000 is an inch less deep (without the rear cable cover attached) than both similar-priced Sony and JVC models — which are currently the two “world’s smallest” native 4K laser projectors — it is more than 2 inches wider. So, out of the box, it looked slightly bigger even though it is roughly the same height. But it has soft, rounded edges that help to mitigate the size.

The next thing I noticed was the motorized lens/dust cover, which is closed to keep the lens protected when not in operation. Seeing my normal lens just sitting out in the open, unprotected and gathering dust, has always been a pet peeve of mine, so I love this feature.
Diaz said that Epson’s Q-Series home projectors are designed to be quieter than commercial models, requiring a different chassis and cooling design. I liked that the cooling system draws air in through the sides of the unit and exhausts it out the front, letting you place the projector right up against the back wall if needed without any fear of overheating.
As with all of Epson’s 4K projectors, the QB1000 is a 3-chip, 3LCD design that uses three individual LCD driver chips and three individual LCD panels, each dedicated for red, green, and blue primary colors to display 100% of the signal for every frame. However, these are all 1920×1080 resolution chips, so getting the full 8.29 million pixels on screen for 3840×2160 4K resolution requires the use of a technique called “pixel-shifting” and a Precision Shift Glass Plate that Epson refers to as “4K display technology.”
This means that every pixel’s image is rapidly shifted four times diagonally and horizontally, allowing each individually addressable pixel to be displayed. This process happens at an extremely high cycle rate, quadrupling the visible pixels on screen to produce the 8.29 million pixels of 4K. This is opposed to the native 4K chips used by manufacturers like Sony and JVC, which don’t require pixel-shifting technology.
A couple of noted bits of technology make these new models possible. One is a new-generation, high-efficiency laser light source, which can achieve higher brightness in a smaller size. Epson claims that the laser light engine is 75% smaller, as well as quieter than previous designs, again making them more usable in a wider number of installation applications.
The QB1000 claims a sub 32 dB fan noise output level at 100% laser brightness, which drops quieter when at 85%, and as quiet as 22 dB at 50% brightness.
Another big improvement in this lineup is Epson’s new proprietary QZX Picture Processor, the company’s most powerful video processing technology to date. This 32-bit chip handles real-time color, dynamic contrast, scene adaptive gamma, HDR, 4K pixel-shifting, frame interpolation, dynamic tone mapping, and resolution super-sampling to most accurately and faithfully reproduce the source material.
Connections are all on the back of the unit, which keeps the sides clean. If you’re a stickler for no visible wires, the unit comes with a rear panel cover that will conceal all the connections, but it does add about 2 inches to the depth. And while they will likely be used sparingly, I did love that Epson included a full suite of D-pad controls on the back of the unit, including a Menu and Lens button that will allow you to perform all operations directly from the unit itself. A menu setting even lets you invert the direction buttons on the unit when controlling the OSD from the unit when it is ceiling-mounted. Smart!
Features
The projector includes two HDMI 2.1 inputs that are full 40 Gbps bandwidth and can accept both 2K/120 and 4k/120 signals. Interestingly, HDMI 2 is eARC-capable, letting you connect the projector directly to a soundbar or other system, like Sony’s Theater Quad. Also interesting is that the eARC connection supports HDMI-CEC control, so you could control a connected CEC-capable device.
The HDMI inputs feature ALLM (Auto Low Latency Mode) for gamers, with a reported input lag time below 20ms.

With its UltraBlack technology, a proprietary compensation filter that controls the polarization of light, the QB1000 can produce a Dynamic Contrast Ratio exceeding 5,000,000:1.
But the big new feature to the QB1000 is video processing that analyzes content on a frame-by-frame basis in real-time, called Dynamic Tone Mapping (DTM). In addition, the QB1000 also supports HDR10+, a dynamic HDR format akin to Dolby Vision. HDR10+ had previously been reserved for a handful of UHD Blu-ray disc releases; however, several major streaming platforms such as Netflix, Disney Plus, Apple TV, and Prime Video have started streaming content coded with HDR10+ metadata, so this feature could become a compelling purchasing driver. It also supports the HLG — Hybrid Log Gamma — HDR standard.
As the name implies, DTM optimizes brightness on a frame-by-frame level, using signal processing to enhance the brightest areas on the screen to retain better gradation, contrast, and a wider dynamic range.
If you’ve read anything about projectors in the current HDR world, then you’ve doubtless run across the term “tone mapping.” Why is this so important for projectors? Theatrical content is mastered on studio monitors capable of reaching 1000 nits, with Hollywood’s workflow shifting to mastering monitors capable of displaying 4000 nits. The problem is that most projectors would struggle to produce 350 nits. So, this content needs to be translated from 0 to 1000 (or even 4000, or up to 10,000) nits, to a range of 0 to 300 that the projector can reasonably handle. But this needs to be performed in a way that maintains both the bright and dark details in the image. When performed correctly, the image will retain the shadow details in dark images while retaining the specular highlights found in really bright images such as shots of the sun, lightning flashes, or snowy mountains. If a projector tone maps poorly, the darker areas or the brighter areas (or both) can be “crushed,” losing detail that was meant to be visible and having no subtlety.
Along with the HDMI connections, there is an RJ45 for connection to a LAN, a USB-A with 5V/2A to power a streaming device, a USB-A with 300mA to power an Optical HDMI cable, a mini-USB for service and backups/restores, an RS-232 DB9 connection, and a 12-volt mini-jack trigger, along with a detachable power connection. The trigger output is configurable to be always on, useful for dropping a motorized screen, or only on when an Anamorphic mode is selected, useful for triggering a lens sled.
In addition to front and rear IR signal sensors, the QB1000 can be fully set up and controlled via IP, and supports PJLink, Control4’s SDDP protocol, and Crestron integration. The Control4 control library offers direct access to virtually every command and setting you might want, letting you give customers access — or pre-programmed commands — to switch to the ideal picture mode or setting when watching different sources, aspects, or resolutions.
The QB1000 is ISFCCC-certified with full RGBCMY hue, saturation, and brightness adjustments for each color. Further, there is a Color Uniformity option that allows tweaking grayscale color balance at different points on the screen.
The menu structure is well laid out, but has a lot of options. If you’re a tweaker and you like to dive into every setting and adjustment, settle in, because the QB1000 probably has exactly what you’re looking for! Need to adjust the HDMI EQ level for use with short, medium, or long cables? Done. Need to turn the LED status indicators off, change the menu color, choose the startup screen, choose what happens when no-signal is preset, or whether to require standby confirmation? All here. It even has a sleep mode timer function! (Though with just 30 minutes at max, you’d better be tired. And there is a one-minute minimum if you feel a narcoleptic attack coming on.)
As is the case with nearly all modern displays — projectors and TVs alike — the QB1000 doesn’t offer any 3D support.
The included remote is well-designed and is backlit for easier operation in a darkened theater. It has direct access buttons to many of the commands you’d use regularly.
Install
The QB1000 can be either front-, rear-, ceiling-, or shelf-mounted. If you are shelf-mounting it, it offers two adjustable leveling feet so you can get it perfectly level and square. When ceiling mounting, the Epson utilizes four mounting holes, allowing for an easier time of squaring and leveling the unit to the screen, and its 28.2-pound weight shouldn’t pose any issues.
As it was a review sample that would not be a permanent resident in my theater, I set the QB1000 on a box in my kitchen, which happens to line up centered on my screen. Once I got it square and level to the screen, installation was as simple as adjusting the lens to fit and focus on the screen.

The QB1000’s lens has a zoom ratio of 1:2.1 and a throw ratio range of 1.35:1 to 2.84:1. This means for a 100-inch, 16×9 image, the projector could sit anywhere from 118 to 248 inches from the screen, and for a 150-inch image, it could sit from 178 to 373 inches. It also offers a vertical lens shift of ±47%, and a horizontal shift of ±96% if you can’t get it positioned dead center. This generous range should give it the ability to replace almost any existing projector at the same location.
While you should never use it, the Epson offers a host of keystone and geometry adjustments that will ensure you can get the image digitally square on screen if you can’t position it correctly. This includes a ±30-degree vertical/horizontal, a Quick Corner, and a Point Correction adjustment that lets you dial in multiple areas on screen. But remember, even a single click of keystone correction can crush your fine resolution detail and introduce artifacts, so don’t use it.
I have a dual-aspect Draper M1300 motorized screen that is 92 inches (16×9) and 115 inches (2.35:1) diagonal. Because of this, the fully motorized, 15-element precision glass VRX lens with memory is a fantastic and much-needed feature in my install. The QB1000 also allows you to store 10 different lens memory positions that save lens shift, zoom, focus, and blanking settings. You can rename these settings so you’ll know which to recall for the variety of aspect ratios employed by modern directors and streaming services. I typically set up memories for 16×9, 2.0×1, and 2.35×1, but with 10 available, you could get as granular as you want.
For those with an anamorphic lens, the Epson has Anamorphic Wide and Horizontal Squeeze settings, which stretch the image vertically or compress the image horizontally.
Another great install feature is the panel alignment that lets you tweak the Red and Blue LCD panels at multiple points on screen for the most accurate alignment. Like the old point adjustment on CRT projectors, you navigate a grid pattern on screen and align the red and blue panels for the sharpest image. This process can take a few minutes to complete, but it certainly can make tiny details and things like text sharper with less color fringing. I also love that Epson includes three separate panel-alignment memories, letting you adjust and store them separately for different lens zoom positions.
In addition to the lens and panel alignment memories, there are also 10 Picture Memory settings that store the color mode (Dynamic, Vivid, Cinema, or Natural), light output, and other picture settings, including any RGBCMY grayscale calibration. There are also five Image Preset Memories that save Noise Reduction, MPEG NR, Super-resolution, and Auto Contrast Enhancement settings.
Operationally, without a control system, getting these four memory settings — lens position, picture memory, panel alignment, and image preset — all selected for a given source/resolution/aspect could take quite a few button presses, and it would be nice if there were a way to save them all under a single recallable memory.
There are no separate SDR and HDR settings, so these will need to be adjusted individually and then saved as separate memories if desired. Epson’s technical account manager and projector guru, Robert Brennan, commented, “The best practice is for color adjustments to be made to SDR content. Based on these values, and using the internal 3D LUT (look-up table), HDR color values are determined.”
As mentioned, this is the first family of Epson projectors to employ DTM, but there is only an on or off setting for this. Both JVC and Sony offer some tweaking to the DTM settings — essentially how aggressive you want the projector to handle the brightest and darkest parts of the image — but with the QB1000’s DTM you don’t. If you disable DTM, then there is a manual 1–20 slider for HDR processing that allows you to lower or increase the Average Picture Level.
Performance
The most accurate out-of-the-box setting is the Natural color mode, which most closely tracks D65, but it disables certain settings like DTR by default. Cinema color leaves these settings on, but is not as close to D65; however, this is where Brennan likes to begin by applying some specific tweaks to white balance, G-M Correction, color scale, and gamma.
The Dynamic mode is for max brightness, and it definitely delivers, but it has a noticeable green bias to the image. Vivid is also quite bright, but it comes with a noticeable blue tint. For viewing in bright rooms, or for customers that want the color to “go to 11,” these would do the trick.
I watched in Natural for the majority of my viewing, but made some tweaks to gamma (-2), DTM (on), and Frame Interpolation (low).
It’s clear straight away that the QB1000 puts out a ton of light, and it was definitely viewable in my great room even with a fair bit of ambient lighting. Would I want to watch something with really dark content like Alien or 1917 during the middle of the day? No. Could I enjoy YouTube and sports? Absolutely. Of course, when the lights dropped, that’s when it really shined, pun intended.
The QB1000 delivers a sharp, detailed picture with great edge-to-edge focus. Things like the instrument readouts and displays in the Darkstar cockpit in the opening of Top Gun: Maverick, or words and files on computer monitors in Zero Dark Thirty, were all visible, and there were tons of fine details in the intricate costumes of the dancing warriors on the boats as we first come into Wakanda in Black Panther. Large cityscapes and broad vistas also revealed loads of detail, with sharp resolution and crisp focus at all points on the screen.
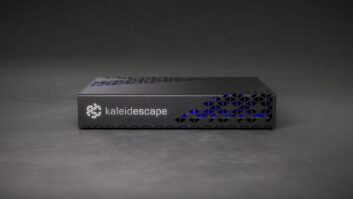
I had been waiting to watch the new 4K HDR release of The Abyss: Special Edition, and finally pulled the trigger and bought it on the Kaleidescape store. It did not disappoint! The detail and sharpness of this 36-year-old film looked amazing, with none of the grain-scrub softness that was present in the Terminator 2 4K release. The QB1000 produced terrific images, full of bright HDR highlights, and only exhibited the smallest bit of banding in some of the difficult underwater scenes.
Regarding the DTM, I found that even without the ability to tweak settings, the QB1000 did a mostly bang-up job. You can toggle it on/off and see the effect that DTM has on the image, and I nearly always preferred it on. Things like the big balls of fire and lightning strikes in Mad Max Fury Road or the dark “Waking Up in Écoust” scene in 1917 all looked better and preserved more detail with DTM on. Even the difficult, ultra-bright scene from Alpha, mastered at 4000 nits, preserved much of the detail in the shining sun.
I was eager to see how the 4K pixel-shifting affected images compared to my native 4K Sony, so I started with a variety of test patterns from the new Spears & Munsil Ultra HD Benchmark discs. For the most part, the pixel-shifting handled these without issue; however, there were times when there would be some slight strobing or flashing in the very finely detailed 1:1-pixel patterns.
In real-world viewing, the pixel-shifting rarely called attention to itself from a typical seating distance; however, there are things that trip it up, and that’s usually tight vertical or horizontal lines when the camera is moving. During the opening of The Dark Knight, there is a window with a grate over it, and the grate has some noticeable shimmer. In Final Destination Bloodlines, one of the doomed characters is wearing a shirt with a tight vertical pinstripe, and this also exhibited that twitter. Other scenes, like fine mesh or angled lines in gates or fences, could exhibit these artifacts as well. Now, take this with a grain of salt; I’m specifically looking for these kinds of artifacts, so I’m more sensitive and aware of them. Would a typical viewer notice? Unlikely. However, compared to a native 4K projector, the QB1000 stumbled.
I felt the QB1000 benefited from having its frame interpolation set to low or normal as opposed to off. When off, there was noticeable blurring of things like scrolling credits or cars driving on a freeway. I felt low cleaned up this motion to a more natural presentation without introducing the soap-opera effect or any other noticeable issues. With the “Sarah on a Hammock” scene from the S&M disc — probably one of the most torturous motion-handling clips — the QB1000 could smooth out the motion of Sarah swinging, but it was definitely at the expense of detail, noise, and artifacts looking through the hammock.
Having lived with several laser projectors, one thing you get used to is the full-fade-to-black (FFTB) on an all-black scene. With the ability to instantly turn the laser on/off, this pitch to full-black enables an OLED like experience at times. (Admittedly, it can be a bit jarring, say during some credit scenes when there is a single name, black screen, single name, black screen, etc., which is why projectors give you the option of disabling the FFTB option.) With the QB1000, the projector will only FFTB when in the Dynamic color mode. Fortunately, you could perform a full-color calibration using the Dynamic mode and achieve accurate color and grayscale, and keep the FFTB feature, but Epson not including that as an option for all color modes is disappointing.
Operationally, I have a couple of small nits. For one, closing most menu/adjustment settings requires three or more additional button presses to get back out of the menu. When I hit “Esc,” get me out of there and close the menu! (I eventually discovered that hitting “Menu” again is the way to close the OSD immediately.) Second, the Epson can be slow to resync the video when changing formats. This wasn’t an issue when watching broadcast television on Dish, but when watching YouTube content and going in/out of ads, or coming in/out of the Kaleidescape menu, the picture would go dark for several seconds.
The Epson QB1000 sets a new benchmark in the lumens-to-dollars category, delivering up to 3300 lumens to produce a dynamic HDR image. For multi-use installations that will be competing with ambient lighting, it offers a compelling argument over a direct view display, with images only getting better when the lights go down!
800-463-7766 – EPSON.COM
Product Specs:
- 3-chip 3LCD laser engine video projector with 3840×2160 (dual-axis 1920×1080) resolution
- 3300-lumen color (IDMS Rated) and white light output (ISO Rated)
- 15-element precision glass structure VRX lens
- Motorized lens system with 1.35-2.84 throw ratio, along with ±96% Vertical and ±47% Horizontal lens shift
- 20,000 laser lifespan (to half-brightness)
- HDR10, HDR10+, and HLG support with Automatic Dynamic Tone Mapping
- Inputs: Two HDMI 2.1 (HDCP 2.3, one supporting eARC), two USB-Type-A, Mini USB (service), RJ45 LAN, RS-232 DB-9, 12-volt mini-jack trigger; Outputs: Detachable power cord
Dimensions: 20.5 x 7.6 x 16.6-inches (WxHxD, excluding rear cable cover); Weight: 28.2 pounds