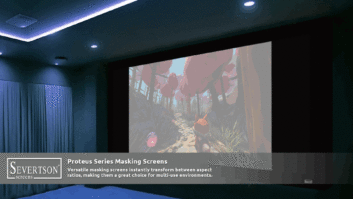
We’ve all been there, we’ve had those clients that want a screen from wall to wall, but don’t have the room height or viewing angle to do so–at least not at the standard 1.78:1 (16:9) aspect ratio. So what do we do? Since most rooms are wider than they are tall, we provide them with a wider screen with multiple aspect ratios, most commonly the 2.39:1 (Scope) aspect ratio is used. By doing so, a 2.39:1 screen accommodates the most common aspect ratios of 2.39:1, 1.85:1, 1.78:1, and 1.33:1. Of course, to do this, we maintain what is known as a “constant height,” which requires side masking to achieve each desired aspect ratio.

We’ve all been there, we’ve had those clients that want a screen from wall to wall, but don’t have the room height or viewing angle to do so– at least not at the standard 1.78:1 (16:9) aspect ratio. So what do we do?
You may be thinking, “If the imager inside the projector has a native aspect ratio of 1.78:1, how would I get an image at 2.39:1 properly?” Great question. In the past, the task of converting a 1.78:1 image to 2.39:1 was handled by introducing an anamorphic lens and image scaling. Today though, modern projectors include lens memory systems that allow for focus, shift, and zoom to be stored within a recallable memory of the projector. So which one should you use?
In the days of standard definition, the image aspect ratio for content was 1.33:1, also known as 4:3. If we had widescreen content, it was often shown in what was called the letterbox format– content had black bars added to the top and bottom of the image to maintain the original aspect ratio of the content. The downside to this format was a significant loss of resolution from the film-to-video transfer. To combat this loss, engineers developed an anamorphic DVD format that would maximize the resolution of the DVD format and improve image quality. The trick was to have a display, and/or DVD player that could recognize the anamorphic format and present it properly for the viewer. If we were utilizing this in a front projection system and a 1:33:1 projector, an anamorphic lens could perform the decompression of the image through an anamorphic lens. No additional image processing or scaling was necessary.
Today, we’ve transitioned to the high definition video system with an image aspect ratio of 1.78:1, also known as 16:9. In this system, anamorphic formatting is non-existent and black bars are added to the top and bottom of the image to format wide screen content. The loss isn’t as bad as you would think, though. We start out with a wider canvas and at a higher resolution than standard definition. But we do need to perform more work if we are to utilize an anamorphic lens system. Instead of simply adding a lens, we now need to add image scaling to artificially stretch the image vertically before adding the secondary lens.
Looking at the details, an anamorphic lens system is going to require more space in front of the projector as it is placed in front of the primary lens. To achieve the best possible image from 1.78:1 and 2.39:1 image content, an anamorphic lens system should be on a motorized sled, allowing for the lens to be moved in for 2.39:1 content and out for 1.78:1 content. We’ll also need an image processor, or scalar, to stretch the image vertically to fit on the imager. As you can imagine, stretching the image introduces image artifacts such as aliasing. In fact, this causes some loss of image resolution, or detail, in the process. There are benefits, however. The increased image area of the chip, for instance, provides higher light efficiency for increased brightness. The pixels also appear smaller on the screen because you’re utilizing more pixels on the imager. While some light and focus is lost traveling through a secondary lens, the increased light from the imager still yields a gain, and focus loss can be minimal with a quality anamorphic lens.
A lens memory system can yield better results, but takes quite a bit more planning to implement properly. First, it is important to ensure that there is a lens available that allows for the projector to zoom down to 1.78:1 and out to 2.39:1. You’ll find this isn’t always the case, or you may have to move the projector’s resting place in order to accommodate the lens’ available. Next, we’ll want a projector that has both horizontal and vertical shift as part of the memory. After all, unless you’re mounting the lens dead center at the screen, a shift after the zoom will be crucial for alignment. The benefits of utilizing this system includes a lower cost, the reduction in physical size by not utilizing a secondary lens system, increased resolution by allowing for pixel-per-pixel accuracy, and increased focus. It is important to remember that the black bars are part of the image in the high-definition system. Therefore, the projector is displaying the image exactly as it has been mastered. The downside is the loss of light output as you’re not utilizing the entire imager, and the pixels will appear larger on the screen.
There is one more option available from a limited number of manufacturers: the utilization of a wider imager. In high definition, the image content is formatted in a 1.78:1, 1920×1080 resolution. There are some manufacturers making projectors with wider imagers such as 2560×1080. These imagers do not provide increased image resolution, as the source content simply doesn’t have more detail than 1920×1080, but they do allow for the pixels to appear smaller on the screen, allowing for the viewer to potentially sit a little closer. In this system, the projector is set up to fill a wide screen aspect ratio and then performs the image scaling for 2.39:1 content and 1.78:1 content. No moving parts are required and space is saved by not utilizing a secondary lens. We are still dependent on image scaling and the image artifacts that come from processing are still apparent, but this can still be an excellent option based on the constraints of the system specifications.
There you have it, a comparison between the various methods for creating an anamorphic image in our high-definition system. While the anamorphic lens option will fit just about any situation, the lens memory system certainly has its benefits, and is preferred when implemented properly. Of course, you’ll want to make sure you have plenty of light to spare, but if you’ve got a bright enough projector, the lens memory system allows for the ultimate in image quality.
David Abrams ([email protected]) is president of Avical, a Los Angeles-based audio/video calibration and consulting company.