I don’t believe it’s a stretch for people in our industry to sell, install, and support lighting. Some people in the CI business thought it was a stretch when the Home Technology Specialists of America (HTSA) first announced that I was joining the group and that my first initiative was to help our members design, specify, and sell lighting fixtures to their customers. I think one person even joked, “Oh what…are we going to start framing houses, too?”
So while it is not a stretch, it is also not an automatic buy. Lighting is more than simply finding a manufacturer that you can buy fixtures from. You can do that, but you are setting yourself up for some pain. With lighting, you can make some mistakes that are really difficult to fix — or at the very least very expensive to fix.
The purpose of this article is to give you the information you need to know to start a successful lighting business, and to give your customers the same great experience they have with your AV installations.
Why Lighting
I had a successful AV integration company that I sold off in the early 2000s and, after taking some time off, I decided to re-enter the industry in an entirely different way. I thought that there was a business model of evangelizing lighting control and only selling Lutron HomeWorks lighting control (and then, ultimately, their recently introduced motorized shades). I didn’t do any AV integration except for consultation.
It was during that time — around 2003 through 2005 — that I observed that there was a wide range in the quality of lighting in the different markets that I was serving across the U.S., and I determined that was primarily because of awareness and that certain markets had professional lighting designers on their projects while others didn’t. Most projects in the United States don’t have professional lighting consultation — at most, the interior designer will weigh in on what the decorative fixtures should be and where they should be located. But the recessed architectural lighting in the home is usually just general ambient lighting and most of it is still treated as a commodity. There is more thought given to what people spend on plumbing fixtures, kitchen appliances, and, now, outdoor living than on lighting.
Some of you may say that you work with lighting designers regularly. But do you work with them on every single project? No — there’re some projects where there isn’t a lighting designer. The architects have laid it out and it goes through the same iteration where the interior designer, the general contractor, the homeowner, and the electrician all weigh in, and there are a whole bunch of cooks in the kitchen.
Lighting is way too important to leave to committee. It needs an expert champion, which is where the integrator comes in. There isn’t a single project I’m on that wouldn’t benefit by somebody taking the lead on the front end of the project and really pinning down what the lighting should be.

Coming to Terms
You will notice that lighting designers don’t exactly speak the same language we do. You may have heard some of these terms before, but they are applied differently with lighting. Here are a few key terms you should know:
- Delivered Lumens: Manufacturers typically give a spec for source lumens — which is measured right at the LED element. Delivered lumens has to do with the output of a fixture when it is in the housing, so it is a much more realistic spec.
- CCT: CCT is Color Correlated Temperature, which is typically expressed in Kelvin. For the most part, people in residential will pick between 2700 and 3000 Kelvin. The lower the number, the warmer the appearance and the higher number the cooler or more bluish the appearance. Two fixtures from different manufacturers can have the same color temperature rating and yet they can appear slightly different. That’s why it’s important if you are using LED fixtures that you try to have the same brand and the same models/configurations in the same space.
- Beam Spread: With most general lighting, there is no beam spread — it just throws light in all directions — but with precision fixtures a professional lighting designer will want to control where light is going and where light is not going for highlighting architecture, accenting art, or when they’re doing their calculations of what the spacing between the fixtures should be. This is a geometry exercise based on ceiling height and on how far apart the fixtures are.
- CRI: CRI, or Color Rendering Index, has to do with how well a light could render a color. This is a standard that was first developed for fluorescent lighting, and it is based on eight pastel colors. Depending on how well they render each color, they’re given a percentage and then they’re given an overall average score. The CRI on a halogen source or the Sun virtually has a CRI of 100; early fluorescent lights might be 60 or 70; early LED lumina sources usually were 80, however current offerings typically achieve 90 CRI or above.
- R9: R9 is tied to the CRI number. There are 16 colors — eight of them are used to come up with the typical CRI score and these can be manipulated and aren’t really that accurate to real life. Some manufacturers will list an R9 value. R9 is like deep rich red. You can have a really high CRI with an LED fixture, but a terrible R9. And if it doesn’t render red accurately, then your flesh tones and your vibrancy aren’t great. So the higher end fixture companies will publish an R9 number as well.
- Photometric Spec: All legitimate fixture companies will publish what’s known as a photometric spec and it’ll show you what the fixture’s light distribution is in a space based on all the components installed.
These are the sort of numbers that you need to understand and know how to apply because there are certain rules for how many foot candles are ideal for a task surface area in a kitchen versus how many lumens are necessary for general lighting and so on. The American Lighting Association (ALA) and ISE publish all of these recommended numbers, so you know what is right — just like when you know what the efficiency of a speaker is in AV.
Related: HTSA Expanding into Residential Lighting Design, Fixtures Services
The Demo: Seeing Is Believing
It’s one thing to talk about it, but you need clients to sense your credibility and have them hire you or pick you over anybody else they might talk to. You need to be able to demonstrate and educate not just the client, but also impress the project’s architect and interior designer that you know what you are talking about and that you have the skill set that the project deserves. Architects and interior designers think they have a good sense of CCT, the impact of a fixture trim, etc. They’ve read about it, they’ve heard about it, and they might think they’ve seen it, but they’ve rarely seen it in an A/B comparison.
It’s a powerful tool to be able to demonstrate these things. Demonstrate what they’re used to and then show them different grades of performance above that. Show them what each light does and what the differences are. This way, when you talk through your design and what you are recommending to use in various areas in the home, they have now seen and understand what you’re talking about.
When doing demos, dimming performance is a huge thing. Most LED fixtures dim very poorly in comparison to what they’re used to if they’ve ever used a dimmer on a traditional incandescent or halogen lamp. It seems perfectly smooth, and, as it dims, it warms. It’s linear and it’s really smooth. However, with LED it’s not like that at all — the color is static and the intensity of the illumination will drop, but it will not shift in color. For some people, that seems odd.
It’s possible to have an LED fixture emulate what people are used to in terms of smooth performance on dimming and color shift, but you’re getting into higher performance and higher cost fixtures — ones where you can program the slope of the dimming curve.

Understanding the Client’s Needs
Once you have won the client with your amazing demonstration, you’re now on the hook to do the design. Before you start, there are a whole host of questions that you need to gather about their project in terms of its construction, its architectural design, what the interior designer’s intent is, and what are the client’s likes and dislikes.
Paint colors are a huge thing. If it’s an all-white room, you know you don’t need as much light because the light from the fixtures is going to reflect off of the white surfaces. If it’s a dark-paneled room, depending on the light levels that you want to achieve, you’re going to have to factor that in because those dark surfaces are just going to absorb all of it — it’s amazing how much dark spaces can suck out light.
The most basic thing that you have to do is get the furniture plan for the project. There are so many architectural lighting plans and electrical plans that people go off of that just have dots on the reflective ceiling plan for lights, and there’s no furniture drawn on there — they’re just lighting the space. And that just doesn’t get it done on a well-designed lighting plan. You need to know where furniture is being placed and you need to know where artwork is intended to be positioned.
You will also need to know other important architectural details. For example, one of the killers is what is used for the ceiling materials. A lot of times people just assume it is going to be 5/8-inch wallboard and then, after you’ve roughed in the recessed fixtures, they say now we’re going to add lap board or we’re going to put in a coffered ceiling and the beams are positioned where you thought the fixtures were going to be placed.
So then you have the lighting laid out on the plan, it all looks great, and everybody loves it. Then when you go to install it, the electrician, plumber, and the HVAC guy are there and suddenly there are floor or ceiling joists in conflict with where you want to put the fixture. What do you do now? You are going to have to shift them over, but if you shift them over, it may look like a mistake was made or it’s not going to do what you need it to do. That’s why it’s critical to be a part of the project early on.
Ideally you’re able to convey your lighting plan before the job is framed. Ideally you’re able to capture what the mechanical specs are going to be — where’s that sewer line going, where’s the HVAC ductwork going, where are the steel beams going — and often no one asks any of those questions and they just deal with it in the field. And typically they’re dealing with it in the field because it was just commodity lighting — just some cans and who cares? But our client spent a premium on layered lighting and high-precision fixtures, and these things either go where they need to go or it’s going to be a giant issue.

I’ve lived all this, and that’s why I’m writing about all the things that I’ve learned on the business side of it — the inner relationships with all of the stakeholders such as the architect, the builder, the homeowner, the other subs, and the lighting fixtures supplier. It can be very painful.
You are almost never in the ideal situation when you start out, but after you complete a project here or there, I have observed that everybody ultimately gets it. I have countless clients that have said, “I can’t imagine us doing what was originally planned other than what you designed and implemented for us,” and then the builder comes around, too. What ends up happening is they start contacting you much earlier in the process.
HTSA and ALA
As director of new technology Initiatives for the Home Technology Specialists of America (HTSA), Tom Doherty’s main mission was to assist the membership in becoming successful residential lighting integrators. In addition to Doherty’s expertise, he partnered with the American Lighting Association (ALA) to get HTSA members certified.
During 2018, HTSA management began executing the delivery of the HTSA Lighting Masterclass Level 1. By the end of 2018, fully 55 HTSA members had achieved certification — with testing conducted independently by the ALA — as Certified Lighting Specialists.
Mind Your Documentation
When you provide the lighting design and the fixtures on a job, you have to have an extra level of attention and project management above and beyond what you do when managing AV and home automation. Most of the things that we put in we don’t have to worry about the building materials because they’re not as impactful as they are on lighting. Also, keep in mind that there is a lot more coordination with the electrical contractor.
When you deliver the fixtures to the site, you have to have an electrical plan that is correlated to the fixture specification sheets, and do a lot of handholding because if the electricians put the wrong fixture in the wrong location, it is really painful and expensive to fix — and they have to be fixed. Plus, there are always things in the field that will be discovered during the construction that will require you to tweak the design.
Related: Lutron Opens Experience Center and Training Facility in NYC
The Right Partner
If all this sounds daunting, the right partner can help. HTSA partnered with the ALA over a year ago, and have put many of our members through their training. And the training is important because we are in the best position to elevate the performance and quality of lighting in our clients’ homes — more so than the manufacturers themselves.
We don’t want lighting manufacturers to experience custom integrators who don’t know what they’re doing — that don’t know how to design lighting, that order the wrong fixture configurations and that want to return them because they don’t have their act together. We as an industry must not let that happen.
HTSA is making sure its members will only be viewed by manufacturers and clients as lighting professionals by partnering with the ALA and developing customized, multi-level education and certification programs. As more than half of HTSA’s membership is already certified as CLS or Certified Lighting Specialists, they are already experiencing the tremendous business benefits of an expanded lighting program in their companies.
Quick Calculations
A few typical rules for installing fixtures.Wall Washing: The rule of thumb for wall washing fixtures is that the distance between them is equal to the distance that they are away from the wall. So if the fixtures are 24 inches away from the wall, they need to be 24 inches on center to achieve effective wall washing. Typically you will have to look at the manufacturer’s specification and see what they recommend as the distance from the wall or the separation range.
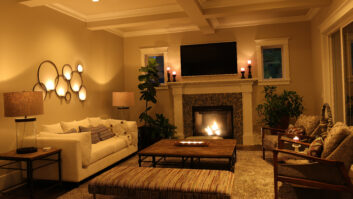
Accenting Art: The best angle of incidence for light to accent artwork is at 30 degrees. So you have to calculate how far the center of the art is from the floor. Typically that’s around 5 feet 6 inches. The center of art can vary, but that’s a good guess. Therefore based on the ceiling height, you aim the light beam at 30 degrees.
Decorative Fixtures:
• How low should a chandelier hang over a table: Hang a chandelier approximately 30 to 34 inches over a table with an 8-foot ceiling height. If your ceiling is higher than 8 feet, mount the chandelier an additional 3 inches higher for each foot of ceiling.If you have a large, two-story foyer, the chandelier should hang at least 5 feet down from the ceiling or should be centered in the middle of any large picture window that might be in the foyer and in street view. For a small foyer, the light should hang no lower than 7 feet above the entrance floor.
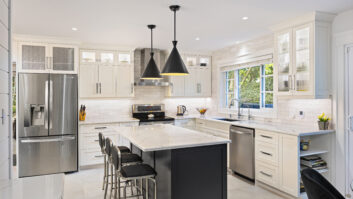
Pendants hung above an island or bar should be 28-34 inches above the countertop. They should be centered over the middle of the island and distributed equally across the length of the counter.
• How high should sconces be mounted: Generally wall sconces are installed at a height of 66 inches to 72 inches (5.5 feet to 6 feet) above floor level (rooms with vaulted ceilings can take a higher placement). However, if the average height of people living in your home is well above 6 feet — or below 5.5, you may want to adjust accordingly! —Tom Doherty